The quest for true creative control in AI art often leads to one powerful technique: regional prompting. It’s the ability to tell a model not just what to create, but precisely where to create it. It’s the difference between a generic image and a detailed scene with multiple, distinct subjects—a giant alien UFO in one part of the sky, and a raging forest fire in another.
But the path to achieving this control can be frustrating. Existing methods often range from inefficient to overly complex, involving sophisticated ControlNet models or tedious inpainting that can feel like a guessing game.
What if the most powerful method was also the most intuitive? What if, instead of calculating coordinates or wrestling with pre-processors, you could simply point to an area on your canvas and give it a direct instruction?
That’s exactly what this guide will teach you. We’ve developed an enhanced workflow that simplifies regional prompting down to its creative essence: you paint a mask, you write a prompt, and the model understands. It’s direct, it’s powerful, and it’s about to change the way you build your images.
Two Golden Rules for Success
This workflow is incredibly powerful, but its magic relies on a few specific technical details. Following these two simple rules will ensure everything runs smoothly and save you from common headaches.
Golden Rule #1: Your Masks Must Use the Alpha Channel
This is the most common pitfall. While you might be used to creating black and white masks, this specific workflow requires your masks to have a true transparent background.
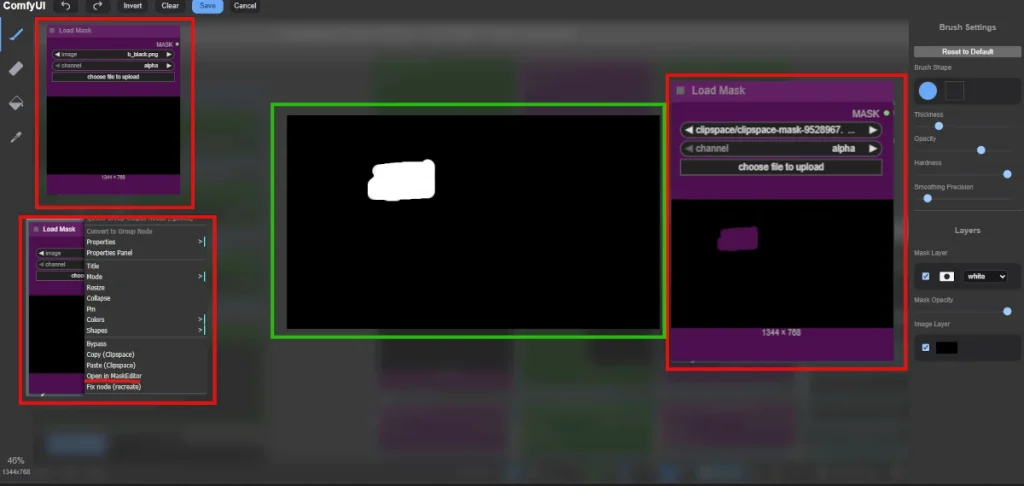
When you are creating your mask, either in an external editor like Photoshop/GIMP or directly in ComfyUI’s mask editor, make sure you are “erasing” to create transparency, not just painting with black.
The final mask file must be saved as a PNG. This ensures the transparency data is preserved.
In the Load Image (as Mask) node, make sure the channel is set to alpha.
Following this rule is the key to making sure the model correctly “sees” the areas you want to influence.
Golden Rule #2: Disable Flash Attention!
If you are an advanced user who typically launches ComfyUI with the –use-flash-attention argument for a speed boost, you need to be aware that Flash Attention is incompatible with this regional prompting workflow.
Why? This workflow uses specialized nodes that directly modify the model’s standard attention layers. Flash Attention completely replaces these layers with its own high-speed version, causing a conflict that prevents the regional prompts from being applied correctly.
The Solution: For this workflow to function reliably, you must launch ComfyUI without the –use-flash-attention argument. The creative control you’ll gain is well worth the trade-off in generation speed for this specific task.
Your Step-by-Step Blueprint
Now that we have the ground rules established, let’s build this powerful workflow from the ground up. We’ll break it down into logical parts, starting with the foundation.

The Artist’s Canvas (Masking)
This is where the magic truly begins, and where this workflow’s simplicity shines. Instead of dealing with complex coordinates, we’re simply going to paint.
For each distinct region you want to control, you’ll need a separate Load Image (as Mask) node. Here’s how to create your masks:
Load a Base: Start by loading a completely black PNG image that is the exact same size as your final output (in our case, 1344×768). Use this same black image for all your Load Image (as Mask) nodes.
Open the Editor: Right-click on one of the Load Image (as Mask) nodes and choose “Open in Mask Editor.”
Paint Your Region: Simply paint over the area you want your specific prompt to affect. Remember Golden Rule #1: you are “erasing” to create a transparent area where the prompt will apply.

Write Your Prompt: Directly below the mask node is a corresponding CLIP Text Encode (Positive Prompt) node. This is where you write the specific instruction for that masked area only (e.g., “A giant alien UFO saucer casting a spotlight”).
Repeat this process for each region. In our example, we have three distinct regions: one for the UFO, one for the calm winter forest, and one for the raging fire.
Download the workflow here: Easy Regional Prompting
The Magic Trick (Programming the Model)
So, you have your individual masks and prompts. How do we combine them into a single set of instructions for the main sampler? This is where the real trick lies. We are going to patch the model before it even begins generating the image.

Chaining the Conditions: Notice the chain of Create Flux Regional Cond nodes. Each node takes a mask and a prompt and bundles them into an “instruction packet.” Crucially, each node also passes its information to the next one in line via the prev_regions input. This creates an accumulating list of all our regional instructions.
Applying the Patch: The final, complete list of instructions is fed into the Apply Flux Regional Conds node. This is the master node of the operation. It takes our original FLUX model and our list of regional instructions and does something amazing: it injects those instructions directly into the model’s brain. It outputs a new, temporarily “patched” model that is now regionally aware.
The Guidance System: The Apply Flux Regional Conds node also needs to know where inside the model’s complex architecture to apply these patches. That’s what the Flux Attention Override node is for. It provides a precise map, telling the patcher to only modify specific attention layers for the cleanest result.
At the end of this step, we no longer have a standard FLUX model. We have a custom-programmed model that knows exactly what we want to generate in every single region of our canvas.
The Payoff (Sampling the Final Image)
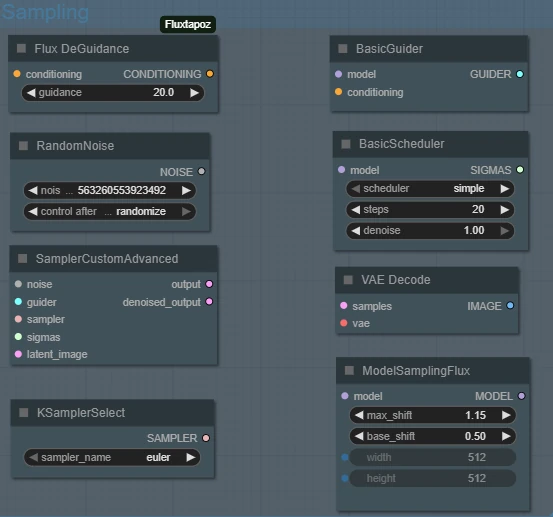
Now for the final and most satisfying step. With our model custom-programmed with all of our regional instructions, all that’s left is to run a standard sampling process.


You’ll notice our “Base Prompt” that feeds into the final sampler is almost empty—it just says “A photo.” This is because all the heavy lifting and descriptive power has already been baked directly into the model itself by the regional conditioning nodes.
The sampler simply takes this highly intelligent, pre-programmed model and runs it through the diffusion process, resulting in our final, complex image where every region perfectly reflects its specific instructions.

By following this workflow, you’ve moved beyond simple text prompts and have learned how to act as a true director for your AI model. You’re no longer just giving it a script; you’re giving it precise stage directions, telling it exactly where to place each actor and how to light each part of the scene.
We encourage you to experiment with this workflow. Try adding more regions, blending different artistic styles, and see just how much creative control you can achieve!
All the AI related work I do, I do on my spare time and most of it I share with the world completely free of charge. It does take up a lot of my time, as well as the cost for running this website. So if you do enjoy my work, please consider visiting my Patreon. I offer a few highly customized nodes and guides there, and I’m grateful for every bit of support I can get from users like you.
By signing up on Mine and Nova’s newsletter, you will make sure you never miss any important updates.
